TABLE OF CONTENTS
Introduction
Shopify, a leading e-commerce platform, offers small businesses an all-in-one solution to create an online store effortlessly. Leveraging its powerful API, Shopify enables merchants to sell across various channels including social media, online marketplaces, and more, all from one centralised dashboard.
Template Solutions
|
Name |
Trigger |
Action |
Description |
|---|---|---|---|
|
Send Feefo Feedback Request from new order in Shopify |
New sale created in Shopify |
Create feedback request (Feefo) |
This flow instantly triggers a Feefo feedback request the moment a new order is placed in (Platform Name). By automating your outreach, you maximize response rates and build social proof without any manual effort. |
|
Create Smartlink Feedback request from new order in Shopify |
New sale created in Shopify |
Create Feedback Request link (Feefo) |
This flow generates a unique Feefo link to be used in your own emails, when a new order is placed. By automating the request process, you provide customers with a frictionless way to share their experience right after purchase. |
Please note that the Smartlink request requires you have to Smartlink active as a feature on your Feefo account.
Triggers are the events that start the flow. All triggers run in real-time, i,e, data is transferred at the moment the event occurs
-
Order created
-
Order paid
-
Order fulfilled
-
Order partially completed
-
Order cancelled
-
Changing an order
-
New customer
-
Changing the customer
-
Customer enable
-
Customer disable
-
New product
-
Product update
-
New Checkout
-
Update Checkout
-
A new abandoned checkout
-
New Refund
-
Order Transaction
-
New Blog Article
-
Draft order created
Actions are what Feefo performs when your flow is running. Actions also allow you to transfer data to other apps and systems
-
Create Product Variant
-
Get a fulfillment by ID
-
Custom API request
-
Update Product Variant
-
Update Inventory Quantity
-
Create new Blog
-
Create a blog article
-
Update a Product
-
Update order Get an order by ID
Before setting up integrations with Shopify connect the app.
Connect the App
-
Open the Integrations Tab, click the Integration Hub.
-
Add a connection button.

-
Type Shopify in the search field and select Shopify from the results.
- Enter an internal name for the connection. This name helps you identify it when adding the app to an automation — especially useful if you plan to connect multiple Shopify accounts.
- You will be asked to provide a Client ID and a Client Secret from Shopify. Keep this screen open and proceed to the next steps in a new tab to generate these credentials.
- Log in to your Shopify account and navigate to the developer area. Click Create app.

- Enter a name for the app — any name works — then click Create.

- Configure the app scopes (permissions). Select all available scopes. The mandatory ones are: Customers, Draft orders, Orders, and Store content. If you plan to use custom connection methods, add any additional scopes your workflow requires.


- Click Release to apply the scope settings.

- Enter a version name for the app — the default is v.1 — then click Release again.


- Once the app is released, open its Settings.

- Copy the Client ID and Client Secret shown on the Settings screen.

- Before leaving Shopify, confirm that the app is installed in your Shopify store. Navigate to the app's Home tab and click Install app.

- Return to Feefo. Paste the Client ID and Client Secret into the corresponding fields, enter your store URL, and click Continue.
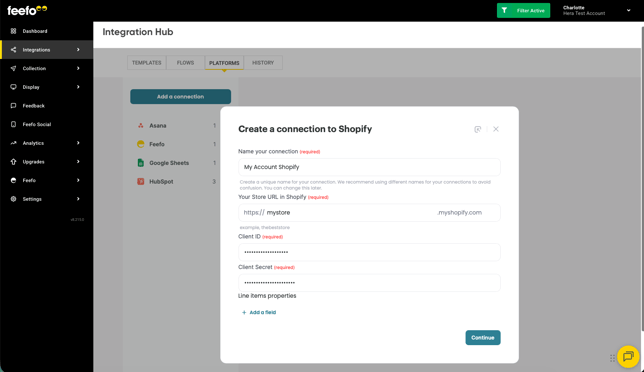
- Your connection is now active and ready to use
Ready! Open the created connection. In the Integration Hub section you can change the name of your connection and refresh its access.
Find out how to use Shopify for Sales Upload